소개
웹 애플리케이션에서 파일 업로드는 필수적인 기능 중 하나입니다. 특히 이미지 갤러리나 첨부 파일 목록을 구성할 때 사용자가 편리하게 여러 파일을 업로드하고, 그 순서를 쉽게 조정할 수 있는 기능을 제공하면 UX(사용자 경험)를 크게 향상시킬 수 있습니다. 이번 글에서는 JavaScript와 AJAX를 이용해 드래그앤드롭 및 순서 조정 기능을 가진 이미지 파일 업로드를 구현하는 방법을 소개하겠습니다. 전체 코드 예시는 맨 아래에서 참고해주세요 !
1. 준비물
- HTML5를 지원하는 최신 브라우저
- JavaScript (특히 jQuery는 필요하지 않습니다)
- 기본적인 CSS 지식
- 파일을 서버에 업로드할 PHP 서버 환경 (선택 사항)
2. 구현할 기능 설명
- 사용자는 여러 이미지를 선택하여 업로드할 수 있습니다.
- 파일을 미리보기 상태로 볼 수 있으며, 이미지가 아닌 경우 파일 이름만 표시됩니다.
- 업로드한 파일의 순서를 위아래로 이동하거나, 맨 위로/맨 아래로 이동할 수 있습니다.
- 이미 업로드한 파일은 삭제할 수 있습니다.
3. HTML 코드: 파일 업로드 폼
아래는 파일 입력과 미리보기 리스트를 위한 HTML 구조입니다. 최대 30개의 이미지를 업로드할 수 있도록 설정했습니다.
<div class="multiple-upload-area">
    <div class="input-wrap">
        <p>이미지 일괄등록</p>
        <input type="file" name="bf_file[]" id="fileInput" multiple="multiple" class="frm_file frm_input" title="갤러리 사진첨부" onchange="handleBulkUpload()">
    </div>
    <ul id="fileList" class="file-list"></ul>
    <span class="upload-note">*최대 30장까지 등록가능합니다.</span>
</div>
4. JavaScript 코드: 파일 목록 관리 및 순서 변경
아래 JavaScript 코드를 사용하여 파일 목록을 미리보기에 추가하고, 각 파일의 순서를 조정하거나 삭제할 수 있습니다.
<script>
function handleBulkUpload() {
    const fileInput = document.getElementById('fileInput');
    const fileList = document.getElementById('fileList');
    const files = Array.from(fileInput.files);

    fileList.innerHTML = ''; // 기존 파일 목록 초기화

    files.forEach((file, index) => {
        const listItem = document.createElement('li');
        listItem.dataset.index = index;

        // 파일이 이미지인지 확인
        if (file.type.startsWith('image/')) {
            const reader = new FileReader();
            reader.onload = function (e) {
                listItem.innerHTML = `
                <div class="file-item">
                    <img src="${e.target.result}" alt="${file.name}" class="preview-image">
                    <div class="file-controls">
                        <button type="button" onclick="moveFile(${index}, -1)">▲</button>
                        <button type="button" onclick="moveFile(${index}, 1)">▼</button>
                        <button type="button" onclick="moveFileToStart(${index})">맨 위로</button>
                        <button type="button" onclick="moveFileToEnd(${index})">맨 아래로</button>
                        <button type="button" onclick="removeFile(${index})">삭제</button>
                    </div>
                </div>
            `;
            };
            reader.readAsDataURL(file);
        } else {
            listItem.innerHTML = `
                <div class="file-item">
                    <span>${file.name}</span>
                    <div class="file-controls">
                        <button type="button" onclick="moveFile(${index}, -1)">▲</button>
                        <button type="button" onclick="moveFile(${index}, 1)">▼</button>
                        <button type="button" onclick="moveFileToStart(${index})">맨 위로</button>
                        <button type="button" onclick="moveFileToEnd(${index})">맨 아래로</button>
                        <button type="button" onclick="removeFile(${index})">삭제</button>
                    </div>
                </div>
            `;
        }

        fileList.appendChild(listItem);
    });
}

function moveFile(index, direction) {
    const fileInput = document.getElementById('fileInput');
    const files = Array.from(fileInput.files);
    const newIndex = index + direction;
    if (newIndex < 0 || newIndex >= files.length) return;

    const movedFile = files.splice(index, 1)[0];
    files.splice(newIndex, 0, movedFile);

    updateFileList(files);
}

function moveFileToStart(index) {
    const fileInput = document.getElementById('fileInput');
    const files = Array.from(fileInput.files);

    const movedFile = files.splice(index, 1)[0];
    files.unshift(movedFile);

    updateFileList(files);
}

function moveFileToEnd(index) {
    const fileInput = document.getElementById('fileInput');
    const files = Array.from(fileInput.files);

    const movedFile = files.splice(index, 1)[0];
    files.push(movedFile);

    updateFileList(files);
}

function removeFile(index) {
    const fileInput = document.getElementById('fileInput');
    const files = Array.from(fileInput.files);

    files.splice(index, 1);
    updateFileList(files);
}

function updateFileList(files) {
    const dataTransfer = new DataTransfer();
    files.forEach(file => dataTransfer.items.add(file));
    document.getElementById('fileInput').files = dataTransfer.files;

    handleBulkUpload(); // 파일 목록 다시 렌더링
}

</script>
5. CSS 코드: 사용자 친화적인 스타일 적용
파일 목록과 버튼을 보다 모던하게 보이게 하기 위한 CSS입니다.
<style>
.file-item {
display: flex;
align-items: center;
background-color: #f8f9fa;
border: 1px solid #dee2e6;
border-radius: 8px;
padding: 10px;
margin-bottom: 10px;
box-shadow: 0 2px 5px rgba(0, 0, 0, 0.1);
transition: background-color 0.3s ease;
}
.file-item:hover {
background-color: #e9ecef;
}
.file-item img.preview-image {
width: 60px;
height: 60px;
margin-right: 15px;
border-radius: 4px;
object-fit: cover;
border: 1px solid #ccc;
}
.file-controls {
margin-left: auto;
display: flex;
gap: 10px;
}
.file-controls button {
background-color: #007bff;
color: #ffffff;
border: none;
padding: 5px 10px;
cursor: pointer;
border-radius: 4px;
font-size: 14px;
transition: background-color 0.3s ease, transform 0.2s ease;
}
.file-controls button:hover {
background-color: #0056b3;
transform: translateY(-2px);
}
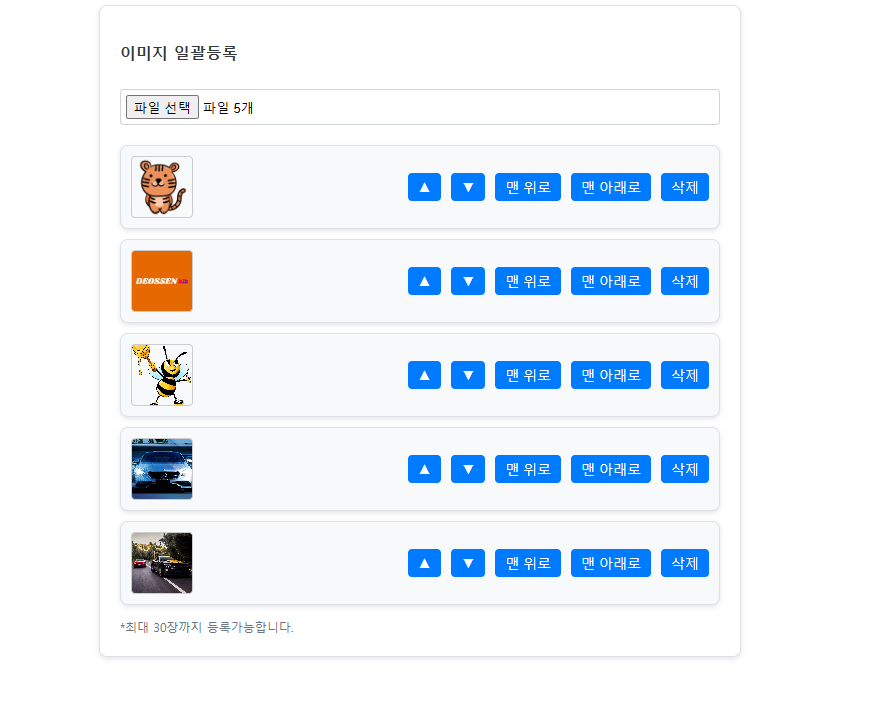
</style>6. 결과 미리보기
실 코드를 반영하여 웹에 적용했을때)

7. 결론
- 파일 업로드 기능에 순서 변경 및 삭제 기능을 추가하면, 사용자가 더욱 직관적으로 이미지를 관리할 수 있습니다.
- JavaScript와 CSS를 활용하여 기능을 구현하고, 더 나아가 서버 측에서 파일을 처리하는 방법까지 확장할 수 있습니다.
- 이번 글에서 소개한 방법을 통해 더 나은 사용자 경험을 제공하는 웹 애플리케이션을 개발해보세요!
전체 코드 예시 )
<!DOCTYPE html>
<html lang="en">
<head>
    <meta charset="UTF-8">
    <meta name="viewport" content="width=device-width, initial-scale=1.0">
    <title>Image Upload with Sorting</title>
    <style>
        .multiple-upload-area {
            background: #ffffff;
            border: 1px solid #dee2e6;
            border-radius: 8px;
            padding: 20px;
            box-shadow: 0 2px 5px rgba(0, 0, 0, 0.1);
            max-width: 600px;
            margin: 0 auto;
        }

        .multiple-upload-area .input-wrap {
            display: flex;
            flex-direction: column;
            gap: 10px;
            margin-bottom: 20px;
        }

        .multiple-upload-area .input-wrap p {
            font-size: 16px;
            font-weight: bold;
            color: #343a40;
        }

        .multiple-upload-area input[type="file"] {
            padding: 5px;
            border: 1px solid #ced4da;
            border-radius: 4px;
            cursor: pointer;
        }

        .file-list {
            list-style: none;
            padding: 0;
            margin: 0;
        }

        .file-item {
            display: flex;
            align-items: center;
            background-color: #f8f9fa;
            border: 1px solid #dee2e6;
            border-radius: 8px;
            padding: 10px;
            margin-bottom: 10px;
            box-shadow: 0 2px 5px rgba(0, 0, 0, 0.1);
            transition: background-color 0.3s ease;
        }

        .file-item:hover {
            background-color: #e9ecef;
        }

        .file-item img.preview-image {
            width: 60px;
            height: 60px;
            margin-right: 15px;
            border-radius: 4px;
            object-fit: cover;
            border: 1px solid #ccc;
        }

        .file-controls {
            margin-left: auto;
            display: flex;
            gap: 10px;
        }

        .file-controls button {
            background-color: #007bff;
            color: #ffffff;
            border: none;
            padding: 5px 10px;
            cursor: pointer;
            border-radius: 4px;
            font-size: 14px;
            transition: background-color 0.3s ease, transform 0.2s ease;
        }

        .file-controls button:hover {
            background-color: #0056b3;
            transform: translateY(-2px);
        }

        .file-controls button:active {
            background-color: #003d80;
            transform: translateY(0);
        }

        .upload-note {
            font-size: 12px;
            color: #6c757d;
        }
    </style>
</head>
<body>
    <div class="multiple-upload-area">
        <div class="input-wrap">
            <p>이미지 일괄등록</p>
            <input type="file" name="bf_file[]" id="fileInput" multiple="multiple" class="frm_file frm_input" title="갤러리 사진첨부" onchange="handleBulkUpload()">
        </div>
        <ul id="fileList" class="file-list"></ul>
        <span class="upload-note">*최대 30장까지 등록가능합니다.</span>
    </div>

    <script>
        function handleBulkUpload() {
            const fileInput = document.getElementById('fileInput');
            const fileList = document.getElementById('fileList');
            const files = Array.from(fileInput.files);

            fileList.innerHTML = ''; // 기존 파일 목록 초기화

            files.forEach((file, index) => {
                const listItem = document.createElement('li');
                listItem.dataset.index = index;

                // 파일이 이미지인지 확인
                if (file.type.startsWith('image/')) {
                    const reader = new FileReader();
                    reader.onload = function (e) {
                        listItem.innerHTML = `
                            <div class="file-item">
                                <img src="${e.target.result}" alt="${file.name}" class="preview-image">
                                <div class="file-controls">
                                    <button type="button" onclick="moveFile(${index}, -1)">▲</button>
                                    <button type="button" onclick="moveFile(${index}, 1)">▼</button>
                                    <button type="button" onclick="moveFileToStart(${index})">맨 위로</button>
                                    <button type="button" onclick="moveFileToEnd(${index})">맨 아래로</button>
                                    <button type="button" onclick="removeFile(${index})">삭제</button>
                                </div>
                            </div>
                        `;
                    };
                    reader.readAsDataURL(file);
                } else {
                    listItem.innerHTML = `
                        <div class="file-item">
                            <span>${file.name}</span>
                            <div class="file-controls">
                                <button type="button" onclick="moveFile(${index}, -1)">▲</button>
                                <button type="button" onclick="moveFile(${index}, 1)">▼</button>
                                <button type="button" onclick="moveFileToStart(${index})">맨 위로</button>
                                <button type="button" onclick="moveFileToEnd(${index})">맨 아래로</button>
                                <button type="button" onclick="removeFile(${index})">삭제</button>
                            </div>
                        </div>
                    `;
                }

                fileList.appendChild(listItem);
            });
        }

        function moveFile(index, direction) {
            const fileInput = document.getElementById('fileInput');
            const files = Array.from(fileInput.files);

            const newIndex = index + direction;
            if (newIndex < 0 || newIndex >= files.length) return;

            const movedFile = files.splice(index, 1)[0];
            files.splice(newIndex, 0, movedFile);

            updateFileList(files);
        }

        function moveFileToStart(index) {
            const fileInput = document.getElementById('fileInput');
            const files = Array.from(fileInput.files);

            const movedFile = files.splice(index, 1)[0];
            files.unshift(movedFile);

            updateFileList(files);
        }

        function moveFileToEnd(index) {
            const fileInput = document.getElementById('fileInput');
            const files = Array.from(fileInput.files);

            const movedFile = files.splice(index, 1)[0];
            files.push(movedFile);

            updateFileList(files);
        }

        function removeFile(index) {
            const fileInput = document.getElementById('fileInput');
            const files = Array.from(fileInput.files);

            files.splice(index, 1);
            updateFileList(files);
        }

        function updateFileList(files) {
            const dataTransfer = new DataTransfer();
            files.forEach(file => dataTransfer.items.add(file));
            document.getElementById('fileInput').files = dataTransfer.files;

            handleBulkUpload(); // 파일 목록 다시 렌더링
        }
    </script>
</body>
</html>

이 글은 실제 코드 예시와 함께 따라 하면서 구현할 수 있게 되어 있어, 독자들이 쉽게 자신만의 프로젝트에 적용할 수 있을 것입니다.
'IT 정보' 카테고리의 다른 글
| Readdy.ai를 활용한 랜딩페이지ai 퍼블리싱 디자인과 사이트 구상하기 (1) | 2025.02.28 |
|---|---|
| SQL 테이블 구조 복사와 데이터 함께 복제하는 방법 (0) | 2024.10.24 |
| PHP strtoupper() 함수로 대소문자 구분 없이 인증키 확인하기 (1) | 2024.10.24 |
| Three.js를 활용한 초간단 3D 씬 및 GLTF 모델 로딩 구현 (0) | 2024.10.15 |
| Swiper.js를 활용한 초 간단 이미지 슬라이더 구현 (0) | 2024.10.15 |